|
|
| Line 242: |
Line 242: |
| <span style="line-height: 5px;"><br></span> | | <span style="line-height: 5px;"><br></span> |
|
| |
|
| * To fill a rectangle, you need L, J or vertical T placements on both the left and right side; provided you donot use exclusively O and I pieces to fill the very left and right columns. You can see this by looking on how many filled cells each piece adds to each column. O, I and vertical S and Z placements add the same number of filled cells to all the involved columns. Horizontal S, Z and T placements add 2 filled cells to their center column and only 1 cell to the edge/side columns. A shift of filled cells towards the middle can not be compensated by O, I and vertical S, Z placements. Only, L, J and vertical T placements can add more filled cells towards the side and compensate that imbalance (originating from horizontal S, Z and T placements as well as one-column-away-from-wall I, O and vertical S and Z placements). This result has no direct influence for the [[Perfect Clear Opener]] but it might be useful to know, if you want to follow it up with a second Perfect Clear. A similar approach can be used to show that a sequence consisting of only S and Z pieces will eventually top out the player, see [[A deadly piece sequence]]. The 5th picture below shows one of only a few ways where an L or J piece is placed on the side but will add more filled squares towards the middle. | | * To fill a rectangle, you need L, J or vertical T placements on both the left and right side; provided you donot use exclusively O and I pieces to fill the very left and right columns. You can see this by looking on how many filled cells each piece adds to each column. O, I and vertical S and Z placements add the same number of filled cells to all the involved columns. Horizontal S, Z and T placements add 2 filled cells to their center column and only 1 cell to the edge/side columns. A shift of filled cells towards the middle can not be compensated by O, I and vertical S, Z placements. Only, L, J and vertical T placements can add more filled cells towards the side and compensate that imbalance (originating from horizontal S, Z and T placements as well as one-column-away-from-wall I, O and vertical S and Z placements). This result has no direct influence for the [[Perfect Clear Opener]] but it might be useful to know, if you want to follow it up with a second Perfect Clear. A similar approach can be used to show that a sequence consisting of only S and Z pieces will eventually top out the player, see [[Deadly piece sequence]]. The 5th picture below shows one of only a few ways where an L or J piece is placed on the side but will add more filled squares towards the middle. |
|
| |
|
| {| style="font-size: 90%; margin-left: 22px;" | | {| style="font-size: 90%; margin-left: 22px;" |
The Perfect Clear Opener is the standard way to get a Perfect Clear (PC) in the first 4 lines of a game (10 dropped pieces). In the first bag, L, J and O pieces form a rectangle and T, S and Z pieces form some kind of trapezoid. I piece is kept on hold, if possible. Then, the player tries to fill the remaining area with the first 4 pieces of the second bag (and potentially the I piece). If I piece is kept on hold throughout first bag, then there is a chance of 84.6 % (711/840) to succeed in theory. If I piece is dropped vertically (I piece forms a 4x4 block together with L, J and O), then there is still a chance of 61.2 % (514/840). If the first Perfect Clear can be executed, then there is a good chance to get another Perfect Clear within the next 2 or 4 lines (provided no garbage lines are received in the meantime).
PC Basics
The most used spins in Perfect Clears are the S- and Z-Spin to horizontal orientation and the L- and J-Spin to flatside down orientation. For the S and Z-Spin, you have to rotate the piece twice in the same direction: clockwise for S piece and counterclockwise for Z piece (that is the direction the piece's head is facing: S piece's head faces right -> use rotate right). Hereby you rotate once, let the piece sit on a bench (vertical orientation) and then rotate again. For the L and J spin you have to rotate back and fourth (e.g. for J piece: first clockwise, then counterclockwise).
Some theoretical results about filling rectangles that can be useful knowing in regards of Perfect Clears:
- Without incoming garbage, you can obtain a Perfect Clear only after an even amount of total cleared lines. Each cleared line subtracts as many filled squares from your playfield as 2 ½ pieces will add. After an odd number of cleared lines, at least ½ piece worth of filled squares will remain in the playfield (amount of filled squares divided by 4 will give a rest of 2).
- Parity: If you lay a checkerboard pattern over the playfield (alternating white and black squares), then all pieces but the T piece will cover 2 white and 2 black squares when placed anywhere on the pattern. On the other hand, A T piece will cover 3 white and 1 black squares or 1 white and 3 black squares. To completely fill a rectangle, you need to cover the same amount of white and black squares in the end. This means that you need an even number of T pieces, if you do not regard line clears.
- Usually, line clears will affect parity, if an odd number of filled squares falls down an odd number of rows. For Perfect Clear setups, we have an even amount of filled squares, so an odd number of filled squares above a line clear is equivalent to an odd number of squares below the line clear. Also, the imbalance of covered white and black squares does not exceed 2, in which case a line clear affecting parity will have the same effect on the (im-)balance as placing a T piece. Summarizing: Single line clears with an odd number of empty cells below the cleared line will have the same effect as placing a T-Piece regarding parity. On the other hand, single line clears with an even number of empty cells below (e.g. line clears at the bottom or very top) will not have any effect. Clearing 2 or 4 lines directly above each other will not have any effect either (horizontal T-Spin Double or Tetris).
|
2 brighter and darker squares for each color
|
1 or 3 brighter squares for each T piece
|
even number of empty cells below line clear
|
balance between bright and dark maintained
|
odd number of empty cells below line clear
|
imbalance, more dark than bright
|
For the Perfect Clear Opener, it means that chances are higher, if T piece comes early in second bag (since the first T piece was already placed). If the second T piece comes late (not within the first 4 pieces of the second bag), then you have to substitute the missing T piece with one of those odd line clears (clearing a line in the middle with an odd number of empty cells below). This usually means clearing the second line with an odd number of empty squares in the first line.
|
With a placed T piece, you do not need to make odd line clears.
|
The T placement clears the second row with 2 empty squares below. The line clear itself does not change parity.
|
The J resp. I placement clears 2 lines directly above each other. This does not change parity despite of the single empty cell below.
|
The missing T piece is substituted with an odd line clear: The O placement clears the second row with 1 empty cells below.
|
The S placement clears the second row with 3 empty cells below. This changes parity, too.
|
The J placement clears the third row with an odd number of empty cells below (and above). It is followed by a tricky Z-Spin.
|
- To fill a rectangle, you will always need an even number of L, J and vertical T placements (if you count all those placements together, then it must add up to an even number). To see this result, we compare the number of covered squares in odd-numbered columns (columns 1, 3, 5, 7 and 9) and even-numbered columns (columns 2, 4, 6, 10). Since our rectangle must contain a multiple of 4 squares, it must have an even amount of columns or its height must be a multiple of 4. In both cases, the difference between squares in odd- and even-numbered columns is a multiple of 4. S, Z and horizontal I placements will add 2 filled squares to both odd- and even-numbered columns which will not affect the difference. Same goes for horizontal T placements. Vertical I placements will exclusively add to either odd- or even-numbered columns, but again the difference between odd and even changes by a multiple of 4. On the other hand, L and J placements will add 3 squares to odd-numbered columns and 1 square to even-numbered columns, or vice-versa. Same goes for vertical T placements. Line clears will not affect the balance of covered cells in odd- and even-numbered columns.
- For the Perfect Clear Opener, it means that you need to use an odd number of L, J and vertical T placements (since you used 3 of those in the first bag). This usually means, that you use either L or J piece and place T piece horizontally; or do not use the L and J pieces at all but place T piece vertically; or you use either L or J piece and do not place T at all. Very ocassionally, you use both L and J and place T vertically.
|
All these placements add 2 filled cells to odd- and even numbered columns (even = bright color)
|
All these placements add 3 filled cells to odd- and 1 cell to even-numbered columns, or vice versa.
|
An example for
"either L or J, horiz. T" (#L + #J + #vertT = 1)
|
An example for
"no L & J, vertical T"
(#L + #J + #vertT = 1)
|
An example for
"either L or J, no T"
(#L + #J + #vertT = 1)
|
An example for
"both L & J, vertical T"
(#L + #J + #vertT = 3)
|
- To fill a rectangle, you need L, J or vertical T placements on both the left and right side; provided you donot use exclusively O and I pieces to fill the very left and right columns. You can see this by looking on how many filled cells each piece adds to each column. O, I and vertical S and Z placements add the same number of filled cells to all the involved columns. Horizontal S, Z and T placements add 2 filled cells to their center column and only 1 cell to the edge/side columns. A shift of filled cells towards the middle can not be compensated by O, I and vertical S, Z placements. Only, L, J and vertical T placements can add more filled cells towards the side and compensate that imbalance (originating from horizontal S, Z and T placements as well as one-column-away-from-wall I, O and vertical S and Z placements). This result has no direct influence for the Perfect Clear Opener but it might be useful to know, if you want to follow it up with a second Perfect Clear. A similar approach can be used to show that a sequence consisting of only S and Z pieces will eventually top out the player, see Deadly piece sequence. The 5th picture below shows one of only a few ways where an L or J piece is placed on the side but will add more filled squares towards the middle.
First PC Success Rates
Here are the 4 Standard Perfect Clear setups depending on: a) whether the first T piece is facing left or right and b) whether the first I piece was already placed or not. With Hold feature and 7-bag randomizer, they have the following success rates depending on what piece shape you receive first in second bag:
| first piece
|
Setup #1
|
Setup #2
|
Setup #3
|
Setup #4
|
|
|
|
|
|
|
| general
|
61.19 %
|
84.64 %
|
61.19 %
|
84.64 %
|
| T piece
|
85.83 %
|
98.33 %
|
85.83 %
|
98.33 %
|
| I piece
|
73.33 %
|
84.17 %
|
73.33 %
|
84.17 %
|
| L piece
|
43.33 %
|
89.17 %
|
67.50 %
|
85.00 %
|
| J piece
|
67.50 %
|
85.00 %
|
43.33 %
|
89.17 %
|
| S piece
|
52.50 %
|
81.67 %
|
58.33 %
|
77.50 %
|
| Z piece
|
58.33 %
|
77.50 %
|
52.50 %
|
81.67 %
|
| O piece
|
47.50 %
|
76.67 %
|
47.50 %
|
76.67 %
|
The following table shows when each setup will work. There are 840 different piece combinations that can occur among the first 4 pieces of the second bag (840 = 7 x 6 x 5 x 4).
| Nr
|
I
|
L
|
O
|
Z
|
T
|
J
|
S
|
sequence
|
#1
|
#2
|
#3
|
#4
|
| 1
|
1
|
2
|
3
|
4
|
|
|
|
ILOZ
|
✗
|
✓
|
✓
|
✓
|
| 2
|
1
|
2
|
3
|
|
4
|
|
|
ILOT
|
✓
|
✓
|
✓
|
✓
|
| 3
|
1
|
2
|
3
|
|
|
4
|
|
ILOJ
|
✓
|
✓
|
✓
|
✓
|
| 4
|
1
|
2
|
3
|
|
|
|
4
|
ILOS
|
✗
|
✓
|
✓
|
✓
|
| 5
|
1
|
2
|
4
|
3
|
|
|
|
ILZO
|
✓
|
✓
|
✓
|
✓
|
| 6
|
1
|
2
|
|
3
|
4
|
|
|
ILZT
|
✓
|
✓
|
✓
|
✓
|
| 7
|
1
|
2
|
|
3
|
|
4
|
|
ILZJ
|
✓
|
✓
|
✓
|
✓
|
| 8
|
1
|
2
|
|
3
|
|
|
4
|
ILZS
|
✓
|
✓
|
✓
|
✓
|
| 9
|
1
|
2
|
4
|
|
3
|
|
|
ILTO
|
✓
|
✓
|
✓
|
✓
|
| 10
|
1
|
2
|
|
4
|
3
|
|
|
ILTZ
|
✓
|
✓
|
✓
|
✓
|
| 11
|
1
|
2
|
|
|
3
|
4
|
|
ILTJ
|
✓
|
✓
|
✓
|
✓
|
| 12
|
1
|
2
|
|
|
3
|
|
4
|
ILTS
|
✓
|
✓
|
✓
|
✓
|
| 13
|
1
|
2
|
4
|
|
|
3
|
|
ILJO
|
✗
|
✓
|
✗
|
✓
|
| 14
|
1
|
2
|
|
4
|
|
3
|
|
ILJZ
|
✗
|
✓
|
✗
|
✗
|
| 15
|
1
|
2
|
|
|
4
|
3
|
|
ILJT
|
✓
|
✓
|
✓
|
✓
|
| 16
|
1
|
2
|
|
|
|
3
|
4
|
ILJS
|
✗
|
✗
|
✗
|
✗
|
| 17
|
1
|
2
|
4
|
|
|
|
3
|
ILSO
|
✗
|
✓
|
✗
|
✗
|
| 18
|
1
|
2
|
|
4
|
|
|
3
|
ILSZ
|
✗
|
✓
|
✓
|
✓
|
| 19
|
1
|
2
|
|
|
4
|
|
3
|
ILST
|
✓
|
✓
|
✓
|
✓
|
| 20
|
1
|
2
|
|
|
|
4
|
3
|
ILSJ
|
✓
|
✓
|
✓
|
✓
|
| ...
|
| 837
|
4
|
|
|
|
3
|
2
|
1
|
SJTI
|
✓
|
✓
|
✓
|
✓
|
| 838
|
|
4
|
|
|
3
|
2
|
1
|
SJTL
|
✓
|
✓
|
✗
|
✓
|
| 839
|
|
|
4
|
|
3
|
2
|
1
|
SJTO
|
✓
|
✓
|
✗
|
✓
|
| 840
|
|
|
|
4
|
3
|
2
|
1
|
SJTZ
|
✓
|
✓
|
✗
|
✓
|
|
|
|
|
|
|
|
|
|
|
|
S
|
514
|
711
|
514
|
711
|
Note: This section was cut short to reduce load time for this page. See the PC Opener Success Rates article for the whole table.
All solutions
In this section we only consider the following two setups (and not their mirrored variants):
The following table shows all different ways of how to achieve a Perfect Clear in the second setup, arranged by the involved pieces and pretty much sorted by how likely it is to attain a Perfect Clear with these pieces. The left side shows all exclusive ways that work for the first setup (whereas the vertical I placement on the left side completes the setup). Below each picture, you can find all orders in which the pieces can be placed to reach this solution (often only possible with softdrop). If a solution uses an I placement, then there is also always a way to place the I piece first. This means the I piece from first bag can be placed before any piece of the second bag in this case. That is why the placement orders in which the I piece is placed first are highlighted (bold font). The black numbers to the right tell you how many highlighted piece orders work for those piece combinations. The left numbers tell the same thing for solutions that work exclusively for the first setup. There are 6 possible orders (in which the other 3 pieces can be placed) when the I piece is placed first. So, the closer these numbers are to 6, the better the chances to reach a Perfect Clear with this piece combination. The grey numbers in the bottom rows do the same for setups that do not involve an I piece (this means the first I piece must stay on hold the whole time). Here, we have 24 different possible orders in which the 4 pieces can be placed.
| shapes
|
#
|
7 pieces setup
|
#
|
6 pieces setup
|
| IITJ
|
6
|
IJIT, ITIJ, ITJI, IIJT, IJTI, IITJ, JITI, JIIT, JTII, TIJI, TIIJ
|
IJIT, IIJT, JIIT
|
6
|
|
|
|
|
| IITL
|
5
|
ITIL, IITL, ITLI, TILI, TIIL, TLII
|
ILIT, ILTI, TLII, LITI, LIIT, LTII
|
5
|
ILIT, ILTI
|
|
|
|
| ITJS
|
3
|
ITJS, ITSJ, TISJ, TJSI, TSIJ, TJIS, TIJS, TSJI, STIJ, STJI
|
IJST, JSIT, JSTI, JIST
|
6
|
ITJS, TIJS
|
ISJT, IJTS, ISTJ, IJST, SITJ, STIJ, SIJT
|
|
|
| IILZ
|
3
|
IZIL, IIZL, IZLI, ZILI, ZIIL
|
|
4
|
ILIZ, ILZI
|
|
|
|
| IJSZ
|
3
|
IZJS, IZSJ, ZISJ, ZSIJ, ZIJS, SZIJ
|
IJZS, JIZS
|
3
|
IZJS, IJZS
|
|
|
|
| IITO
|
3
|
IITO, ITIO, ITOI, TIIO, TIOI
|
|
3
|
|
|
|
|
| IIOJ
|
3
|
IOIJ, IIOJ, IOJI, OIIJ, OIJI
|
|
3
|
|
|
|
|
| IIJS
|
3
|
IISJ, ISIJ, ISJI, SIIJ, SIJI
|
|
3
|
|
|
|
|
| IITS
|
2
|
IITS, ITIS, TIIS
|
|
4
|
ISTI, ITSI, ITIS, SITI, STII
|
|
|
|
| ITLJ
|
2
|
ITJL, ITLJ, TIJL, TILJ
|
|
3
|
ILTJ, ITLJ
|
|
|
|
| ITSZ
|
2
|
ITSZ, STIZ, TSIZ, TISZ
|
ITZS, TZIS, TIZS
|
2
|
|
|
|
|
| ITOJ
|
1
|
IOJT, OIJT, OJIT
|
|
6
|
IOTJ, IJTO, ITOJ, IOJT, ITJO, TIOJ, TIJO
|
IJTO, ITJO, TIJO
|
IJTO, IJOT, JIOT, JITO
|
IOJT, OIJT
|
| ITLS
|
0
|
|
|
5
|
ITSL, ISTL, ITLS, SITL
|
ILST, ILTS, LITS, LIST
|
ITSL, ITLS, TILS, TISL
|
ILST
|
| ITLZ
|
0
|
|
|
3
|
ILTZ, ITLZ, TILZ
|
ILTZ, ILZT, LITZ, LIZT
|
|
|
| ITJZ
|
0
|
|
|
3
|
ITJZ, IJTZ, IJZT, TIJZ
|
IJZT, JIZT
|
|
|
| ITOL
|
0
|
|
|
3
|
ILOT, ILTO, ITLO, TILO
|
ILOT, LIOT
|
|
|
| IOJS
|
0
|
|
|
3
|
IOSJ, ISOJ, SIOJ
|
IOJS, OIJS
|
|
|
| IIOL
|
0
|
|
|
3
|
IILO, ILIO, IIOL
|
|
|
|
| ITOS
|
0
|
|
|
2
|
ISTO, ITSO, SITO
|
STOI, STIO
|
|
|
| ILSZ
|
0
|
|
|
2
|
ISZL, IZSL, SIZL
|
|
|
|
| IOLS
|
0
|
|
|
1
|
ILOS
|
LOSI, LSIO, LSOI
|
|
|
| TJSZ
|
0
|
|
|
13
|
JSTZ, JSZT, SJTZ, SJZT
|
TSJZ, STJZ, SJTZ, SJZT
|
SZJT, SZTJ
|
ZSJT, JSZT, JZST, SZJT, ZJST, SJZT
|
| TLSZ
|
0
|
|
|
10
|
LZTS, LSTZ, SLTZ, LZST, LTSZ
|
TZLS, TZSL, STZL, TSZL
|
LTZS
|
|
| TLJS
|
0
|
|
|
6
|
LTJS, TLJS
|
JTLS, TJLS
|
STJL, STLJ
|
|
| TOLS
|
0
|
|
|
6
|
TSOL, STOL, TOSL
|
LOST, LSOT
|
OTLS
|
|
| TOLZ
|
0
|
|
|
3
|
ZTLO, ZLTO, TZLO
|
|
|
|
| TOJS
|
0
|
|
|
2
|
JSOT, SJOT
|
|
|
|
Following Up
If the Perfect Clear fails, there is sometimes still a chance to get a Perfect Clear after 6 or 8 lines. An example (including Tetris and T-Spin Double):
In the following, we assume that the Perfect Clear was successful though. If the O piece from second bag was not placed yet, then there is a slight chance to get a second PC after 2 further cleared lines. This also requires the O piece from the third bag to come early and that at least 2 out of the 3 T, S and Z pieces from second bag were already placed.
It is more likely to achieve a second PC after 4 instead of 2 further cleared lines though. In this case, 20 pieces were placed in total which means that 3 entire bags were used whereas one piece of the third bag will stay on hold. 3 entire bags means that the player can predict which pieces will appear at the end of the PC which allows to use certain setups depending on what pieces from the second bag were not placed yet. However, 3 entire bags also means that 3 T pieces must probably be used in total in which case the player must apply one of those "odd" line clears (Parity changing line clears) when not done yet (in the first PC). All in all, when the complete second bag is placed in a good way, then there is a chance bigger than 80% to place the third bag in a way that allows a second PC. If the T piece OR both L and J pieces from second bag were not used in the first PC, then there are often ways to stack the rest of the second bag in a setup that results in a 100 % chance for a second PC.
As explained in the PC Basics section, an odd number of L, J and vertical T placements must be done in the second bag in order to achieve the first Perfect Clear. So, the remaining pieces of the second bag (after the first PC) fit in exactly one of these 4 categories:
- T piece, either L or J piece: In this case, it is best to place the second T piece vertically. If you do so, then you will have to make an even number of L, J and vertical T placements in the third bag to achieve the PC which usually means to use both L and J, and place the third T piece horizontally (and deny odd line clears).
- no T piece, both L and J piece: This is also a pretty nice case. Again, in order to achieve the PC you will have to make an even number of L, J and vertical T placements in the third bag. Unfortunately, if the T piece is used from third bag, then you will have to apply one of those odd line clears.
- no T piece, either L or J piece: Not so nice. You will have to make an odd number of L, J and vertical T placements in the third bag to achieve the PC. This means that you always have to place the third T piece and make an odd line clear. If you place the third T piece horizontally, then you will have to avoid placing either L or J piece.
- no T piece, neither L or J piece: Not so nice, majorly because you have barely enough L and J pieces to fill out the corners. On the bright side, you will have to make an even number of L, J and vertical T placements.
Here are some good ways to place the second bag's remaining pieces (subdivided by category):
Setups involving a T Piece
| Setup
|
success
|
Origination
|
|
|
100 %
|
|
|
|
|
|
|
|
|
|
|
|
100 %
|
|
|
|
|
|
|
100 %
|
|
|
|
|
|
|
100 %
|
|
|
|
|
|
|
100 %
|
|
|
|
|
|
|
99.8 %
|
|
|
|
|
|
|
100 %
|
|
|
|
|
|
|
100 %
|
|
|
|
|
|
|
99.6 %
|
|
|
|
|
|
|
100 %
|
|
|
|
|
|
|
100 %
|
|
|
|
|
|
|
100 %
|
|
|
|
|
|
|
100 %
|
|
|
|
|
|
|
100 %
|
|
|
|
|
Setups involving both L piece and J piece
| Setup
|
success
|
Origination
|
|
|
100 %
|
|
|
|
|
|
|
99.9 %
|
|
|
|
|
|
|
100 %
|
|
|
|
|
|
|
100 %
|
|
|
|
|
|
|
100 %
|
|
|
|
|
|
|
100 %
|
|
|
|
|
|
|
100 %
|
|
|
|
|
|
|
96.0 %
|
|
|
|
|
|
|
99.9 %
|
|
|
|
|
|
|
99.5 %
|
|
|
|
|
|
|
100 %
|
|
|
|
|
|
|
100 %
|
|
|
|
|
Setups involving either L piece or J piece
| Setup
|
success
|
Origination
|
|
|
94.2 %
|
|
|
|
|
|
|
91.0 %
|
|
|
|
|
|
|
80.0 %
|
|
|
|
|
|
|
98.3 %
|
|
|
|
|
|
|
97.9 %
|
|
|
|
|
|
|
94.9 %
|
|
|
|
|
|
|
92.9 %
|
|
|
|
|
|
|
92.5 %
|
|
|
|
|
|
|
91.2 %
|
|
|
|
|
|
|
84.1 %
|
|
|
|
|
|
|
90.6 %
|
|
|
|
|
|
|
81.6 %
|
|
|
|
|
Setups involving neither L piece nor J piece
| Setup
|
success
|
Origination
|
|
|
94.0 %
|
|
|
|
|
|
|
98.6 %
|
|
|
|
|
Placing the 3rd bag (2nd PC)
Note: This section was cut short to reduce load time for this page. See the PC Opener Continuations article for many more setups.
Now, let us have a look at how the third bag can be placed to achieve the second PC (after 20 placed pieces resp. 4 further cleared cleared after first PC), depending on how the playfield looks like before the third bag is placed (the grey blocks originate from the remaining pieces of the second bag). In the following, we will use the term "redundant" for a solution which only works for bags where another (non-redundant) solution also works. The redundant solution may still be better for certain bags, e.g. it may be easier spottable, require less softdrops or result in a nice combo or Double before the PC. So redundant does not mean worse necessarily. From time to time, we will also use the term "intact" respectively "non-broken" solution which means that no piece is split in 2 parts in the corresponding picture. This requires the correct amount of T pieces to be used (T piece is used if and only if there is a parity imbalance among the grey blocks).
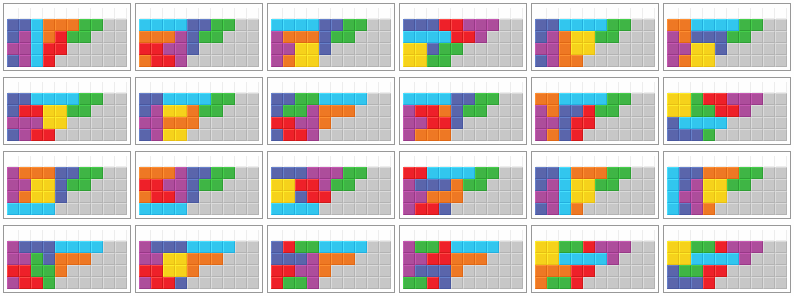
T piece placed (either L piece or J piece)
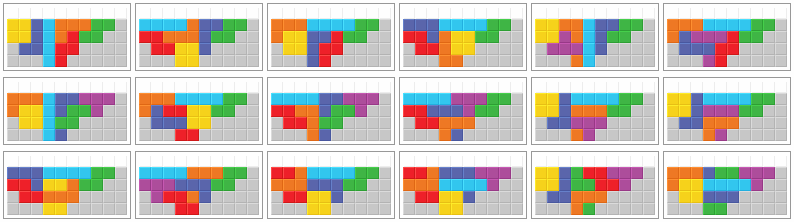
Every bag can be stacked in at least one of the following 12 ways. Pictures 4, 10 and 11 show redundant solutions. The solution shown in picture 12 has by far the lowest success rate from this selection but it may work with bag orders where the others will fail. When starting with L, J and either S or Z, one can immediately clear the 2 rows in the middle, too (similar to picture 11).

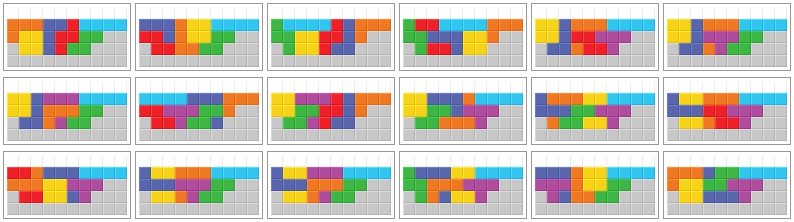
Every bag can be stacked in at least one of the following 12 ways. Pictures 3, 4, 6, 7 and 8 show redundant solutions. Not every intact solution is shown. Again, the solution shown in picture 12 has by far the lowest success rate from this selection. Note that the I piece can be spun in the bottom row (like in picture 2) without placing any additional pieces. While this is impossible in the mirrored field, one of the shown solutions will always work there. More precisely, pictures 2, 4 and 6 show redundant solutions for the mirrored playfield.

Every bag can be stacked in at least one of the following 12 ways. Pictures 7 to 9, 11 and 12 show redundant solutions.

99.6 % of all bags (5018 out of 5040) can be stacked in at least one of the following 12 ways. Pictures 3 to 5 and 8 show redundant solutions. Not every intact solution is shown.

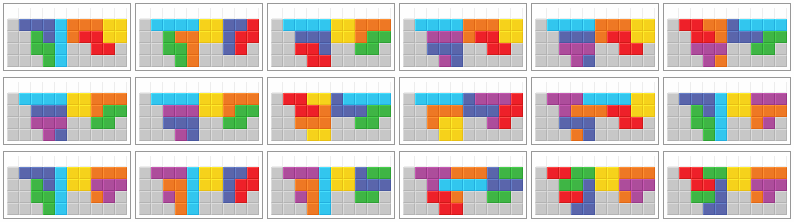
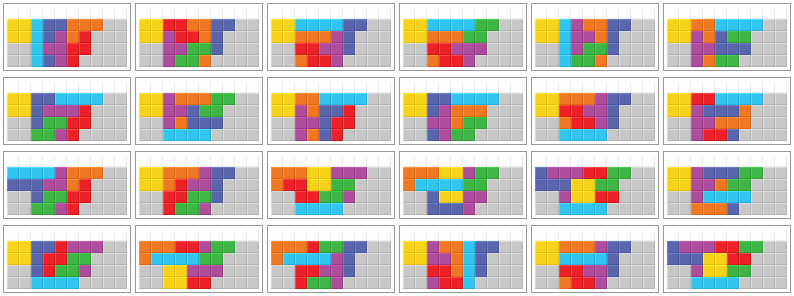
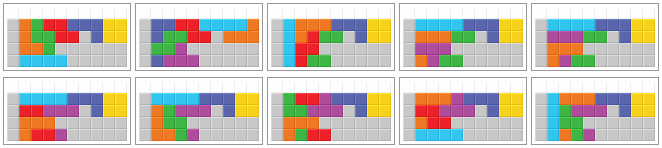
Both L piece and J piece placed (no T piece)
Every bag except LTOJZIS and TLOJZIS can be stacked in at least one of the following 18 ways. Pictures 3 and 10 to 14 show redundant solutions.
Every bag can be stacked in at least one of the following 18 ways. Pictures 4, 7 to 9 and 15 to 17 show redundant solutions.
Every bag can be stacked in at least one of the following 18 ways. Pictures 7 to 11 show redundant solutions. The solution shown in picture 18 has the lowest success rate from this selection but it may work with bag orders where the others will fail.

Every bag can be stacked in at least one of the following 18 ways. Pictures 3 and 9 to 12 show redundant solutions.
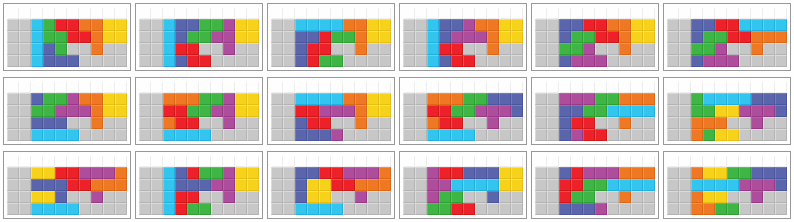
Either L piece or J piece placed (no T piece)
94.2 % of all bags (4748 out of 5040) can be stacked in at least one of the following 12 ways. Pictures 3 and 6 show redundant solutions.

80 % of all bags (4032 out of 5040) can be stacked in at least one of the following 5 ways. Pictures 4 and 5 show redundant solutions. At least one solution will always work when T piece comes first in bag.

97.9 % of all bags (4934 out of 5040) can be stacked in at least one of the following 30 ways. Pictures 5, 8 and 9 show redundant solutions. Solutions in bottom row have a relatively low success rate.
92.9 % of all bags (4682 out of 5040) can be stacked in at least one of the following 12 ways. Pictures 9 to 12 show redundant solutions.

84.1 % of all bags (4240 out of 5040) can be stacked in at least one of the following 18 ways. Pictures 6, 8 to 10 and 14 to 18 show redundant solutions.
Neither L piece nor J piece placed (no T piece)
94.0 % of all bags (4736 out of 5040) can be stacked in at least one of the following 10 ways. Pictures 6 to 9 show redundant solutions. No further solution exists.
98.6 % of all bags (4968 out of 5040) can be stacked in at least one of the following 18 ways. Pictures 8, 9 and 12 show redundant solutions. The last 2 solutions have very low success rates.
See Also
External links


