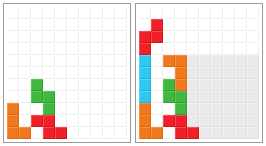
The Infinite T-Spin Triple Setup, or short Infinite TST, is a looping pattern invented by the player Massi4h. Each loop consists of 2 T-Spin Triple Towers and 4 T-Spin Triples in total. It will only work in guideline games (bag randomizer, hold feature, T-Spins) but there it is one of the most efficient methods to score points in singleplayer modes like Ultra or Marathon. It can also be powerful in certain multiplayer modes where back-to-back T-Spin Triples send a lot of lines (e.g. Tetris Battle).
Mirrored and Reversed Setups
Usually, players stack the setup on the left side which means the 4 left-most columns are used for the pattern and the right side is filled with excess pieces. In that case, the pattern needs 3 L pieces, 2 I pieces, and 1 of S, Z and J. The player must either try to keep T in hold for the next T-Spin Triple, or L and I for building the next T-Spin Triple tower.
It's also possible to build the setup in other ways. For example, completely mirrored on the right side. In that case, the pattern needs 3 J pieces, 2 I pieces, and 1 of S, Z and L. This may actually work better under high gravity. It's also possible to just mirror the 4 columns of the pattern, and not the whole stack. We will call that "reversed" in the following. The reversed patterns actually work worse under high gravity - there's one placement (the J/L piece overhang) which can't be done under 20G.
| left side
|
right side
|
right side reversed
|
left side reversed
|
|
|
|
|
|
|
|
|
|
|
The Start
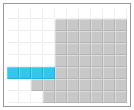
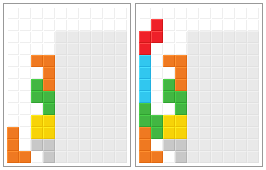
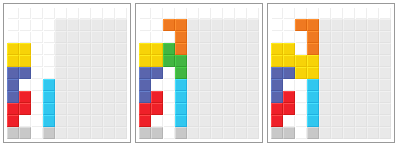
The following subsections list ways to start the Infinite TST looping pattern on the left side. In any case, the goal is to reach the following 2 shapes at the bottom:

Openers
When starting with an empty board, a player might use these:
- Early Z piece: Just place a Z piece horizontally 2 columns away from the left wall. This method has the disadvantage that 2 T pieces must be wasted on the right side before the first T-Spin Triple is made.

- T-Spin Single: There are few methods to build the desired shape on the left side with the help of a T-Spin Single. This method has the advantage that usually only the second T piece must be wasted without doing a T-Spin (that said sometimes the third T pieces must be wasted as well). The first listed way always works when starting with a J piece whereas the second way already builds part of the T-Spin Triple Tower in the first bag.

- TKI 3 variant: The desired shape on the left side is created with the help of a T-Spin Double. Always works when starting with an I piece and receiving L before O.

- Another TKI 3 variant: This time 2 T-Spin Doubles are used to create the desired shape. Always works when starting with an I piece.

- 2 x T-Spin Double (again): This method always works when starting with both L and J (maybe need an I-Spin). Note that in the second bag Z piece can be placed after J (yet another spin).

- Albatross: This method results in a platform T-Spin Double followed by a T-Spin Triple. Always works when starting with O and L. Note that in the second bag the S piece can be placed after Z (provided I piece has not been placed yet).

- DT Cannon LS/JZ base: DT Cannon is by far the most commonly used way to start an Infinite TST. It results in a T-Spin Double followed by a T-Spin Triple. This way always works when starting with L and J or L and S, or just J (maybe Z spin needed).

- DT Cannon TZ base: Another DT Cannon. It will always work when starting with T and Z or T and S. The stack usually looks the same way after 2 bags.

- Pseudo DT Cannon: The following ways result in a T-Spin Double followed by a T-Spin Triple. One of them will always work for the first bags where the two DT Cannons above are not applicable. In the second bag J piece must be kept on hold until the first T-Spin is made.

Three Residuals
Usually, the 4 left-most columns don't interact with the other columns in Infinite TST, that means pieces are placed entirely in the left section or outside of it. In this case there will be 4*n + 3 filled cells in the left section with an arbitrary integer number n because each left-placed piece adds 4 filled cells and each cleared line removes 4 filled cells. For this reason Infinite TST can be started easily, if there are 3 leftovers in the 4 left-most columns. Here are some ways to do so; some of them use certain T-Spin techniques. Note that in any case the left section can be mirrored resulting in the "reversed" build.
- Direct Starts: A T-Spin Triple Tower can be stacked immediately.

- T-Spin Triple: A T-Spin Triple can be stacked directly.

- 3 x T-Spin Triples: 3 T-Spin Triples can be stacked directly. Note that you most certainly have to waste some T pieces in the right stack until you have built up the tower.

- Super T-Spin Double: This way uses a STSD which is a technique that usually results in 2 T-Spin Doubles. Instead of executing the second T-Spin Double, a T-Spin Triple Tower is stacked instead.

- Imperial Cross: This way uses an Imperial Cross which is a T-Spin Triple above a STSD. Again, a T-Spin Triple Tower is stacked instead of executing the second T-Spin Double of the STSD.

- T-Spin Triple Skim: Here one line is burned in order to stack a T-Spin Triple.

- Skim until Setup: For other combinations of 3 left-overs, you can usually burn 1 or 2 lines until one of those left sides from above shows up.

Other Residuals
The situation is more complicated for amount of residuals different from 3, 7, 11 and so on. In that case it's necessary to make a placement with blocks inside as well as outside of the 4 left-most columns. In the following we assume that the stack resembles a 3 wide where the fourth column is not too high, and try to apply the setups from above that make an I piece placement in the fourth column (or first column for a reversed build). When we speak about residuals in this section, we mean the amount of filled cells in the 3 left-most columns.
- Direct Conversion: We apply the 3-residuals setups that make an I piece placement in the fourth column.

- Skim until Conversion: Since we have a 3 wide, placing pieces in it will change the amount of residuals (plus 4 per placement but minus 3 per cleared line). So, all 3 stacks shown above are eventually reachable.

- TST beneath DT Cannon: This might be needed if the fourth column is too high for that 1-residual stack

- Reversed Conversion: We apply the 3-residuals setups that make an I piece in the first column and stack them reversed.

- Reversed STSD: We apply the Super T-Spin Double and King Crimson setups and stack them reversed.

- Reversed Burn: We burn lines until we reach the reversed version of that one T-Spin Triple Tower.

- Double Triple: If the fourth column is very low, we may use one of the T-Spin Double into T-Spin Triple Openers, namely DT Cannon and Albatross (which resembles Pseudo DT Cannon).

- T-Spin Mini into ...: If the first column is empty, one may make a T-Spin Mini and try to use one of the other mentioned techniques afterwards.

Burning Lines
In order to use nothing but T-Spin Triples over a long period, the player is allowed to waste only one T piece every 15 bags: 15 bags are 15*7*4 = 420 filled cells or 42 completed lines which corresponds to 14 T-Spin Triples. Usually in practice however, more T pieces than that must be put in the 6 right-most columns, either to stabilize the stack on the right side or because the T-Spin Triple tower is not ready yet when a T piece arrives. If 2 T pieces are wasted in a relatively short period of time, then it's best to burn some lines. Rule of thumb is to burn 2 lines for every wasted T piece.
Skimming above the pattern
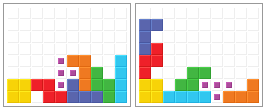
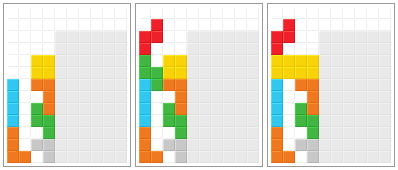
In order to burn some lines above the pattern, we have to fill the 4 left-most columns in rows that are already filled on the right side. The best chance to do so is in the following 2 situations:

In the second situation, the Z piece overhang is still missing. Sometimes, the Z piece can be placed before the lines are completed. Example:

The following pictures show some ways to fill the 4 left-most columns, sorted by the amount of cleared lines. The easiest way is placing an I piece horizontally - this can be done at any time, provided the I piece isn't needed somewhere else. However, this means that you just reduce the height of the stack by one row but give up the back-to-back bonus for the next T-Spin Triple in return. The most score-effective way is a Tetris which keeps the back-to-back chain going. Tetrises aren't that easy to set up though. If a piece is displayed dotted and split into 2 halves, it means that a line clear must happen before that placement.


Skimming amid the pattern
S, Z and O pieces are barely used in the 4 left-most columns. If there's a bunch of them coming and there's no space for them in the 6 right-most columns, then the player may still insert them in the pattern which will result in 2 burned lines eventually:


Switching Directions
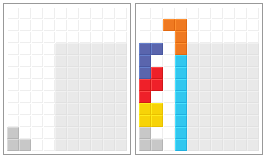
At one point during the loop, there's nothing left in the 4 left-most columns but the overhang from a previous T-Spin Triple Tower (plus maybe S & L already placed on it). In this case one single line can be skimmed at the very bottom of the playfield with the help of an O piece or a J piece. In case of the O piece, nothing really happens: the previously built tower is build once again (skipping the tower facing in the other direction). In case of the J piece however, the Infinite TST setup is converted to the reversed build! Likewise, the reversed build can be converted to the normal build with the help of a L piece skim at the very bottom (not shown). Note that the skim with the O piece is not possible if S & L were already placed on the overhang of the previous tower (but the I piece can be placed before the skim).

T-Spin Double Skim
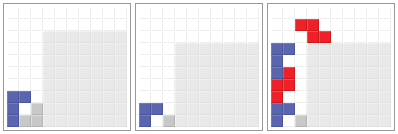
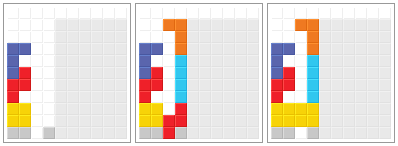
At one point during the loop, there's a T-Spin Double at the bottom of the playfield but an I piece is used instead to build a T-Spin Triple Tower. However, when receiving a T piece at the wrong time, it might be better to take that T-Spin Double instead of placing the T piece in the 6 right-most columns. A Single must be done after the T-Spin Double, thus the next T-Spin Triple has no back-to-back bonus. The combination T-Spin Single plus Double is also possible. The pattern shown in the most right picture is usually the best choice, if an I piece is needed somewhere else (plus the upper J piece can be placed before the skim).

See also
External links

