Four Column Combo Setup ("4-Wide")
The 4 Column Combo Setup is the most difficult to maintain and is the riskiest to go for, but also allows the longest chains and is also the most damaging in multiplayer. The key to maintaining a combo chain with this setup is by clearing lines in a manner so that you are left with a 1 hole gap for your next line clear, or 2 to 3 holes that are adjacent to eachother. Breaking this rule will cause an S, Z, or O piece to end your combo chain.
This method of comboing is used by experienced players who plan ahead several pieces accordingly. Nearly every line clear in this method is a single. In games with garbage blocking the maximum combo chain for a 4 column setup is 21 (in a 22h field). A 4-wide setup will only work properly with Hold feature available. Even under Guideline rules, the player probably needs to utilize SRS wall kicks from time to time, which may slow down the execution (especially with slow softdrop speed).
Center Techniques
You can also leave the gap in the middle. This is much harder to stack, but has a significant defensive advantage. Usually, a top out happens when a new piece spawns in collision with the stack. Leaving the 4 center columns empty prevents this. This technique is often called center 4-wide (opposed to the more common sidestacked 4-wide). A center 3-wide is also possible, but in this case a newly dealt I piece leads to a top-out (unless Initial Rotation System is available).
Side 4 Wide
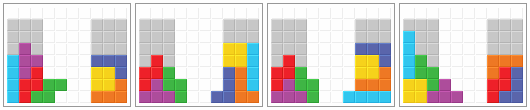
In the picture above, you could already see an example of side(-stacked) 4 wide: A big 6 wide tower on the left side, the right 4 columns are almost empty, just 3 filled cells in the bottom rows. These are known as residuals; the amount of residuals will not change as long as you only clear single lines with such residuals. If you clear garbage lines during your combo or clear multiple lines, you are likely to change how many residuals you have. 3 residuals is most common. The Combo Setups article will tell you how the 4 columns can look like during a successful 4 wide and which placements can be done to maintain the combo.
The 3 filled cells (residuals) are created by placing a piece partly overlapping with those 4 columns:

Center 4 Wide
The comboing (successively clearing lines) in center 4 wide works exactly the same way as in side(-stacked) 4 wide. The only difference is how the tower is built. Instead of a huge 6 wide tower on one side, we will have two 3 wide huge towers on each side which means that the 4 columns in the center of the playfield stay almost empty (again 3 filled cells).
The advantage of this technique is that it circumvents the top out mechanics. There are 2 ways to top out in guideline games: a) you place a piece entirely over the visible area, b) a piece spawns colliding with one filled cell of the stack. This means the player is only topped out, if the bottom of the center 4 wide is pushed to the very top by garbage.
So it is a more defensive strategy. It is more effective against T-Spin and Perfect Clear openers. However, it has a disadvantage, too: It is harder to stack the towers and it may prove difficult to build the towers almost equally big.
Center 4-Wide Opener
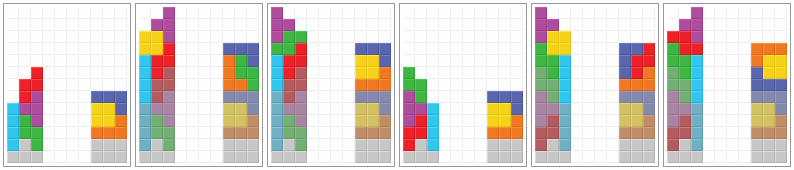
Here are the basic ways to place the first bag. The first setup will usually work when receiving S piece or Z piece before T piece. The second or third setup will usually work when receiving T piece before S piece and Z piece. Only bags with early O but late L and J will prove difficult. Here, the fourth setup may work best.
After the first bag the surface of the towers will usually look like this: one tower is perfectly flat and the other looks like it had a T piece (flat side down) on top. The second bag can usually be placed in one of the following ways preserving the perfectly flat structure of that one tower and letting the other tower always look the same way (besides mirroring). Note that in any of those cases the L and J piece are dropped on the flat stack, supplemented with either O, S or Z. T piece and I piece belong on the other tower.

More issues can occur during the third bag. If possible, place the pieces like in pictures 1 to 4 which result in the same stack (besides mirroring). But you may be forced to do things like in pictures 5 or 6 (or even worse) where you will need another O and / or I piece to flatten out the formally flat side.

A further way to place bags 2 and 3 is shown below. It also results in the stack known from pictures 1 to 4 above. The left tower is not flat after the second bag but the small cliff is compensated in bag 3. Note that in the second picture you can place S piece before L and J (softdrop required).
The longer the game goes on, the harder it is to predict what will happen. Under some circumstances you can combine an O piece and two L pieces to a rectangle. Or it is better to leave out 4 cells located above each other which will be filled later with an I piece (via softdrop). Or leaving out 4 cells in the shape of a T.
6 Residuals
So far we have only considered 3 filled cells in the 4 almost empty columns. 6 filled cells is also an option. While it will not be used in side 4 wide, it is common in center wide. Here are some basic ways to place the first bag in center 4 wide with 6 residuals.

Pictures 4 to 6 belong to picture 3: There will only be 2 filled cells in the center columns after the first bag and it will stay like that until the player must get rid of a piece or start the combo.
Comboing is pretty similar to 3 residuals. Usually, there is only one empty cell in the bottom row (often located in the center 2 columns) which means there are 3 filled cells above this line. So, 6 residuals is equivalent to receiving an extra garbage line with a hole in said column.
After a T-Spin Setup
Some openers such as Gamushiro Stacking and Okey-Cannon can be continued with Center 4-Wide after a T-Spin Single/Double/Triple. Here are a few examples.
Tips and Tricks
There are some tips and tricks on using Center 4-Wide.
- Upstacking: There are several piece combinations when building the 3-wide stacks. Some shapes require 2 of one tetromino. You may refer to 3-Celled Well Patterns for more ways, but it's more reccomended to practice stacking it instead. Some examples:
|
shapes without T
|
shapes with T
|
- Parity: In terms of upstacking, pay attention to T pieces. If a T is on one side, then we need to stick the next T on that same side. Ts change the parity of the stack and make it harder to deal with. So instead of placing a T both the left and right stacks simultaneously, it is best to instead place a T on one stack and then use the next T to balance it. T pieces have a property that differentiates it from the other pieces. If you put all the tetrominoes on a checkerboard, you will find that they all have two dark minos and two light colored ones except for the T.
|
T has more dark
squares than light.
|
- Vacant spaces: Sometimes, it is necessary to leave vacant spaces in the stacks and fill them in later to maintain a clean stack (This is often not required with good stacking). Some examples:
- Tossing it: If we can't place a piece in the 3-wide stack without it causing an extremely unstable stack and/or hole, then it's usually best to just toss it in the 4-wide stack until the 3-wides stabilize.


